
A couple of months ago I started using Drafts since I got frustrated with how iA Writer on iOS was synchronising content between devices or actually the lack of it. Whenever I change a document on one device that I had opened through Dropbox I had to explicitly close and open it on another device for the changes to be synchronised. So I tried to move to iCloud for managing my drafts but there the behaviour wasn’t all that different. Content only got updated whenever the app felt like it.
Compared to that synchronisation in Draft worked nearly instantaneously but it came at a cost:
- All content is stored inside a proprietary format inside a private iCloud folder.
- I cannot add images to my articles but have to do that outside of app.
Especially the latter made me finally start evaluating Ulysses. At €39 per year it’s about twice as expensive as Drafts but I can use whatever storage provider I want for my files and also add images!
Image & attachments
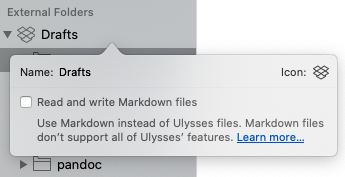
While Ulysses is primarily a Markdown editor, attaching images to an article requires you to use their proprietary file format (with the file-extension .ulyz). Since I want my articles to be synchronised using Dropbox, the first thing I had to do was to uncheck the “Read and write Markdown files” checkbox for my external folder:
Once I did that and created a new document all sorts of previously hidden features showed up:
- When I use the
(img)shortcut for inserting an image, not only can I specify a URL but also select a file! - The “Attachments” sidebar now also shows images and other non-keyword fields!
So what’s the cost here? How complicated is that file format and could I hack my way around it for my publishing process?
Proprietary .ulyz file format
Let’s work on a little example here to illustrate the structure of the proprietary .ulyz files. Taking test.ulyz as example, it’s basically a zip file with the following content:
test.ulysses
├── Content.xml
└── Media
   └── someimage.5b14b85e78e04764860acbfb02b3ea13.png
The Content.xml does no longer contain Markdown but is a custom mark-up language called “Markdown XL” which looks somehow like a mixup of Markdown and HTML:
<sheet version="5" app_version="19.1">
<markup version="1" identifier="markdownxl" displayName="Markdown XL">
	<tag definition="heading1" pattern="#"></tag>
	<tag definition="heading2" pattern="##"></tag>
    <!-- ... -->
</markup>
<string xml:space="preserve">
<p><tags><tag kind="heading1"># </tag></tags>Getting to know Ulysses</p>
<p></p>
<p>A couple of months ago I started using Drafts.</p>
<p></p>
</sheet>
Any image that is directly attached to that sheet is stored inside the Media folder and referenced inside the content file like this:
<element kind="image"><attribute identifier="image">5b14b85e78e04764860acbfb02b3ea13</attribute></element>
Workflow
Since I have to use that proprietary format if I want to properly work with images, I can only use VIM (et al.) once I’m in the final steps of publishing an article. That’s pretty much the same as with Drafts but with the advantage that I can use images 😉 I still like Ulysses UX enough that I can live with that and also invested some time in making any interaction with the produced markdown files optional.
So how do I now publish content from Ulysses onto my blog on both my Mac and my various iOS devices?
macOS
- I first export a document using the “Quick Export” feature (CMD+6) as TextPack and store it somewhere on my file-system (usually
$HOME/tmp). - I have created a little server for receiving and processing TextPacks to which I can send the file using cURL:
curl -H Authorization:secretKey https://zerokspot.com/receive/ -F data=@path/to/doc.textpack. This will check the file, reformat some of the Markdown and finally create a pull-request on GitHub. - I then go to GitHub and take a look at what the Markdown would look like for the new post. If everything is OK then I simply hit the “Merge” button and the deployment pipeline kicks in 🙂
iOS
For iOS the process is pretty much the same with the exception that I created a little Shortcut that I can trigger from within the share-dialog in Ulysses which does step 2 for me.
To make the whole process a bit clearer, this would be all the components that are involved before publishing a new post on zerokspot.com:
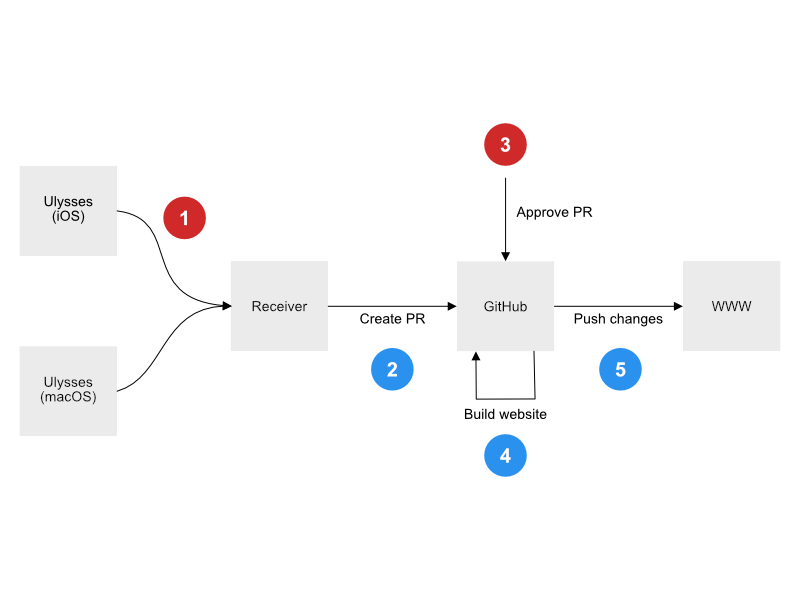
It’s not simple but it’s quite flexible and (at least for me) very comfortable as I can now use the same tools no matter the platform I’m on while still having everything versioned in Git.
Keywords
One small issue I have with Ulysses is the way it handles keywords when exporting content to TextPack/TextBundle: It doesn’t. Neither the generated info.json nor the text.md includes any reference to which keywords were attached to the original document.
As a quick workaround I’ve simply defined that the last line of every post can contain a list of tags/keywords each prefixed with #:
#blog #hello #world
It’s not ideal but that’s a small price to pay for the otherwise great experience I have here 🙂
Do you want to give me feedback about this article in private? Please send it to comments@zerokspot.com.
Alternatively, this website also supports Webmentions. If you write a post on a blog that supports this technique, I should get notified about your link 🙂